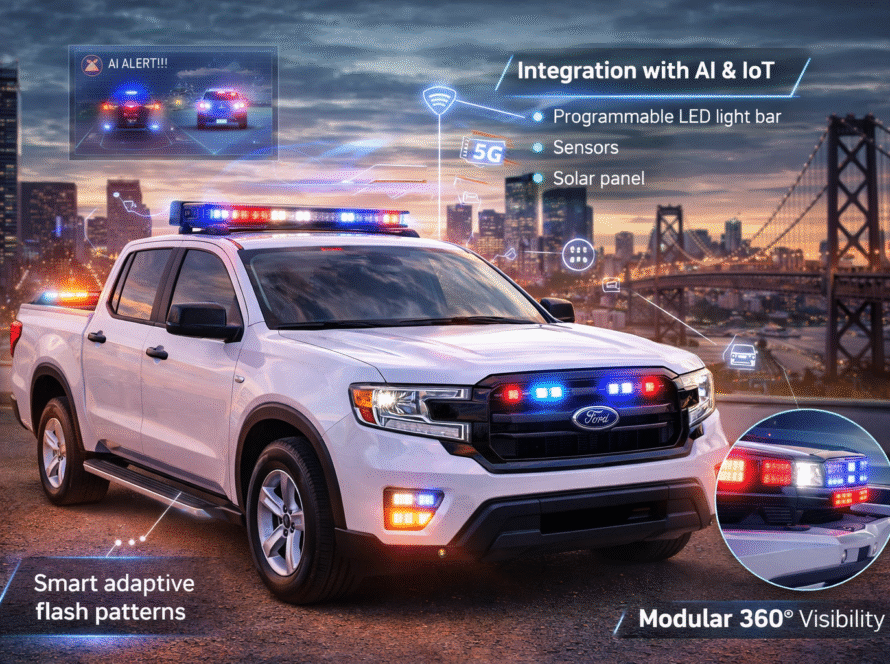
Light bar take down lights are a critical upgrade for emergency and tactical vehicles that need focused forward lighting without sacrificing 360° warning visibility. When configured correctly, roof light bars with take-down capability improve driver awareness, illuminate scenes faster, and enhance safety during night operations and roadside calls.
Most agencies and fleet operators still treat roof light bar configuration as a one-size-fits-all decision but the reality is that light needs change by environment, vehicle height, windshield rake, roof load, and day-to-day mission demands. A patrol SUV in Florida traffic, a rural fire truck rolling through smoke, or a utilities fleet working storm night shifts all require different setups.
OCM Upfitting installs and fabricates around real-world use, so this guide breaks down the features and configurations that actually matter when deploying roof-mounted light bars with built-in take-down lighting systems.
Visibility Meets Function – Why Take-Down Lights Are Non-Negotiable
A full-length roof light bar provides omni directional alerting, but when you’re on a crash scene, traffic stop, fire callout, or perimeter operation, responders need clear forward lighting too. Take-down lights are engineered to switch from flashing alert mode to a solid, high-powered forward-facing illumination mode instantly.
OCM Upfitting offers systems designed for maximum emergency lighting products, ensuring your builds deliver both warning visibility and focused scene lighting. Our emergency lighting output solutions allow full system integration with light bars, controllers, wiring, and mounts that deliver stable power and consistent performance. You can explore available lighting product installs here using anchor text emergency lighting output:
But adding take-down lights isn’t enough. They need the right aim, housing, brightness, wiring protection, mounting geometry, and activation control.
Top Configuration Features to Look For
1. Forward Illumination Strength (Measured by Real-World Use, Not Marketing Claims)
The strongest take-down lights aren’t always the brightest on paper — they’re bright where it matters. Look for bars using purpose-focused LEDs designed to project far ahead and spill wide over a scene. Light bars with adjustable take-down modules give installers the ability to correct aim after mounting, ensuring the beam lands where operators need it.
2. Modular Take-Down Units vs. Fixed Straight Beams
Agencies that run mixed terrain environments should always prioritize modular lights. Modular take-downs let you select flood, hybrid, or spot beam modules, swap modules during future retrofits, and adjust beam angles without replacing the entire bar.
Fixed straight beams may work for sedans, but on tall rooflines — especially pickup, SUV, and van platforms — modular take-downs prevent light wash against hoods and maximize distance projection.
3. Alignment with Windshield Rake & Hood Clearance
Take-down lights should be angled slightly downward, but never so far that they lose distance. Many vehicles with steep hood lines reflect light glare into windshields when take-downs are mounted too low or too flat.
Best practice alignment includes:
-
SUVs: 5–10° downward tilt
-
Standard sedans: 2–5° downward tilt
-
Vans/Utility fleets: 8–12° tilt depending on roof height
-
Tactical builds: hybrid angle with wider spill for scene recognition
4. Dedicated Circuit Protection for Solid Mode Activation
When take-downs fire into solid mode, they draw a different electrical load than flashing alerts. High-grade light bars use built-in voltage regulation and load-balancing circuits that prevent flickering or accessory shutdown when toggle from flash→solid happens mid-response.
5. Rear-Facing Safety Override Mode
Your rear modules should still allow flash or dim-out warning when take-downs are activated. Many new light bars support rear flash-sequence overrides that let responders maintain traffic communication while flooding front lighting for scene command.
6. Optically Sealed Lens & Housing Durability
Lenses should always be:
-
scratch resistant
-
impact tolerant
-
UV protective
-
sealed against moisture intrusion
Weather sealing matters more in southern U.S. states where flood response, rain, humidity, and long hot days are normal conditions. Properly sealed lens housings increase lifespan and reduce fogging inside the bar.
7. Mounting Brackets Matched to Chassis Movement
This isn’t about “shock absorption” buzzwords — it’s about vehicles that bounce, accelerate, turn hard, brake fast, and roll over unpredictable roads.
Quality installs should use bracket systems that prevent:
-
harmonic vibration rattle
-
metal fatigue on mounts
-
loose bolt drift
-
light bar micro movement
OCM Upfitting fabricates custom aluminum brackets for perfect roof + rail mounts especially when OEM mounts fall short.
8. Controller Interface Integration That Works with Gloves, Eyes on Road, and Limited Visibility
The bar should integrate seamlessly with:
-
manual switch consoles
-
compact controllers
-
hands-free siren integration if available
-
backlit control boards for night use
-
aux button overrides for take-down quick launch
Driver simplicity is safety, and controller placement should avoid blind reaches.
Common Light Bar Colors Combined with Take-Down Lighting
The most functionally optimized color combos include:
-
Red / Blue / White Take-Down Combo → Patrol and pursuit fleets after dark
-
Red / Clear / Flood Take-Down → Fire rescue scene lighting
-
Red / Blue / Hybrid Take-Down → Patrol + perimeter tactical environments
-
Amber / White Take-Down → Utility, construction, storm response fleets
-
Tri-color Tactical Bars → Mixed agency deployments where state lighting differs
White take-down lights add universal illumination without interfering with colored emergency flash patterns when balanced correctly.
Vehicle Type Recommendations
| Vehicle Type | Best Take-Down Configuration |
|---|---|
| SUV Patrol Fleet | Modular flood + 5–10° windshield aligned tilt |
| Pursuit Sedans | Low-angle hybrid spot for long-distance ID |
| Fire Rescue Trucks | Dual flood take-down pods with rear flash override |
| Utility Fleets | Amber flash + wide white flood take-down |
| Tactical Units | Red/Blue hybrid flash + hybrid down-tilt take-down |
Installation Best Practices That Save Time and Issues Later
-
Dry test fit brackets before drilling
-
Confirm final take-down beam aim after tightening mounts
-
Route wiring away from roof pinch points
-
Use anti-corrosion fasteners for long-term stability
-
Label circuits for faster future maintenance
-
Test flash→solid transition without accessory drop
-
Maintain rear flash alert when front flood is active
Real Take-Down Light Configurations → Real Safety Results
A properly installed roof light bar with take-down modules reduces response confusion, improves scene recognition, protects vehicle electronics from load spikes, and gives drivers the forward light they need instantly — without losing 360° alert visibility.
It’s not about over-engineering — it’s about engineering right.
If you’re planning a new build or fleet lighting upgrade, the right configuration starts with an expert install. OCM Upfitting fabricates custom mounts, handles full wiring, controller integration, and installs high-output light bar take-down lights that match your department or fleet’s real mission needs.
? Don’t leave lighting performance to trial-and-error.
? Get it installed right the first time by certified vehicle upfitting professionals.
? Book your appointment now or Schedule your installation to speak with our team directly.